Feeds:
Posts
Comments

Archive for the ‘intermodal’ Category

By the time you read this I’ll be in Freiburg for the weekend, learning about Permaculture. I’ll be doing this four times over the next few months and I reckon it will cut down on model making time severely, so on the weekends I’ll away I’ll prepare some videos to avoid blank space syndrome. To start with, a couple of videos of the Japan Railways M250 Freight multiple unit (FMU). FMU’s were tried in Germany as well, but they don’t seem to have worked very well and are now ‘in storage’ which probably means ‘dumped behind a depot somewhere’. Japan seems to be having a lot more success with them -although these are operated exclusively for one large company.

Considering that they’re running on 3’6″ gauge they don’t hang about either. Bearing in mind the road system in Japan is pretty slow and and the highway system is all toll roads and (theoretically) limited to 80km/h I reckon they could give  trucking firms some serious competition:

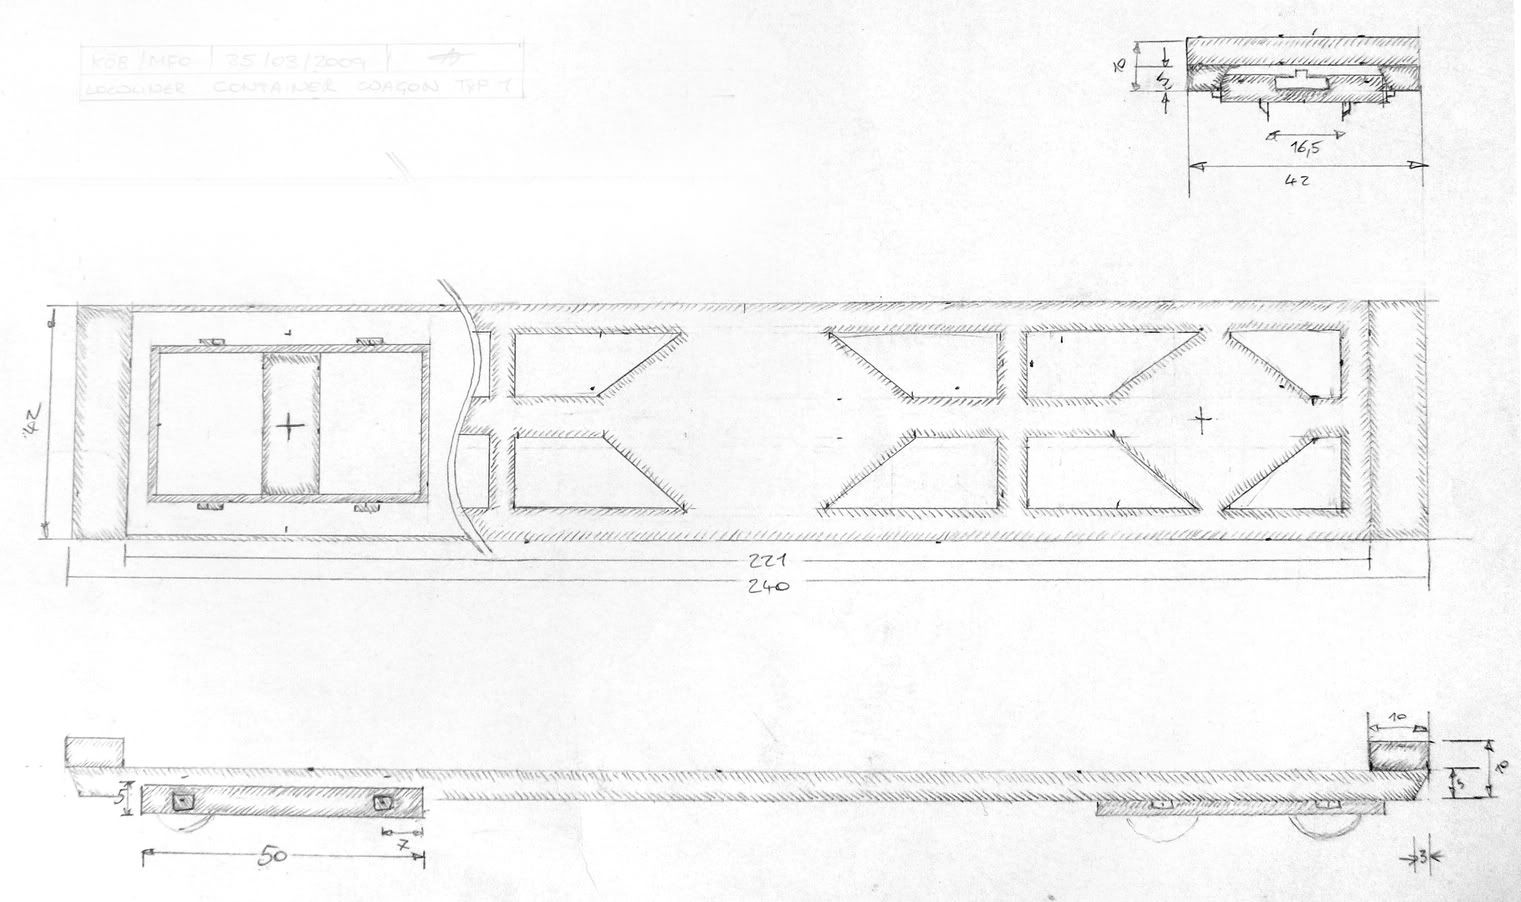
I wonder it the KÖB would use a smaller version? On second thoughts, better not: I’d never fit it on the layout…

I’ll be back soon with hopefully not too harrowing stories about traveling by rail and bike to Freiburg im Breisgau.

Read Full Post »

I’ve always preferred solid and workday locomotives over pretty lined-out preserved stock, and Japan Rail’s B-2-B class DD51 locomotives fit the bill perfectly, so here’s a couple of videos I found for my big diesel ‘fix’.

The first video is an intermodal train being top-and tailed by 2 examples of the class. They often seem to work in multiple which makes me think that for their size they aren’t overpowered. (Video 1 min 3 sec)

This is more how I know them: double heading block petrochemical services in industrial ports. All of Japan’s oil is imported, and a fair bit of it, it seems is carried from the ports by rail. with tankers are as big as the JR loading gauge will allow. (Video 2 min 30 sec)

There’s a more rural video here (37 sec) on YouTube but unfortunately I can’t embedd it.

I was watching these last night while working on various projects for Spitzenwald and Obermettingen. More on that to come.

Read Full Post »

For the self-respecting modern, customer-orientated narrow gauge railway with freight ambitions and one eye on the bottom line, the ‘Must-have’ accesory is a container wagon. Transporter wagons or rollboks have their very useful place, but they are specialised and complicated bits of kit, whereas the good old ISBU container is simple and needs pretty normal equipment so hoist it off a truck or standard gauge train, and load it onto the narrow gauge version to be carried up into the depths of the Black Forest: Everyone has a container crane these days.

Here’s a bad picture of a design for a 40′ intermodal wagon I’ve started. The deck is already complete but it’s a lousy day for taking pictures…

I’m going for a skeletal look with either home made bogies hidden under there or cut-down versions from Cambrian Models: final decision to be based on how well or badly my own designs turn out. I’m not sure where I’ll put the weight though: I guess I’ll have to be all creative with air reservoirs or something. The wagons will need to be low, by the way so the containers can be unloaded at any siding without needing a loading bay, which makes them more flexible for customers.

Oh, I’ll admit it, it’s because I think they look nice…

Read Full Post »

Posting is a bit sporadic at the moment because I’m still trying to get everything sorted for the move, and there isn’t enough banmdwidth in the world to detail the trials and tribulations of dealing with utilities companies.

In the hope of switching off, I had a brief look at YouTube and found this gem of a video from YouTube user Wimzelluv, whose videos of the RHB I’ve posted before. I’ve long suspected that Road-rail tractors could work on NG, an here’s the proof:

Another example of how NG can provide a simple, cost effective transport solution today.

Time to work on the container wagon.

Read Full Post »

In which I don’t announce a change to 1:87 scale.

So I’d almost completed the railcar, and as is fairly common for me, I get distracted by something else, namely building a 1:55 scale 40′ container, as you do. The nice people over at the MTI Forum had put a print of container sides with their logo up, and very kindly gave me permission to print one out. So a couple of evenings and several pieces of former cereal packet later, and I’ve got my container, and a problem. Put against the railcar, the container looks tiny. This meant that somewhere I got the numbers wrong: either the container was too small, or the railcar far, far too big.

It was the railcar. A quick check on the forum showed that the Container was correctly scaled which means that the railcar I’ve been laboriously building is way oversize. Ouch. So now it’s back to the drawing board and rescaling the railcar design so that at some point when I feel up to it, I can restart the project. It’s not a total loss though: I’ve learned a lot, mostly that simple looking stock with subtle corners is a lot harder to build than it looks, and rescaling has a lot of advantages, namely that the stock will be a lot shorter and narrower than I thought, so I don’t have to worry so much about overhang, which means I’ll be able to fit more inAdd to this the fact we’re hunting for a bigger flat, and the boys seem to have learned that shelves are not climbiung frames, and there may be a layout in the offing, when I’m a bit less busy…

But first I’ll be doing some less adventurous stock building. Methinks that container could do with a wagon to run on.

Read Full Post »

Moreau et Fils at ExpoNG 2008. Photo by Farlight Works (click it for the blog)

'Moreau et Fils' (Gn15) at ExpoNG 2008. Photo by Fairlight Works

I really like making modern image narrow gauge models, and I’ve been talking a bit to John P. about container wagons for forty-foot containers, which I’d like to try in 5.5mm scale. I’m intending to make a layout for the railcar as soon as I can, although that’s not likely to be very soon: assuming that I go for a bare minimum of about 5 wagons and a coach, and maybe a shunting loco (which is about as much as I could manage on a micro anyway) then I’ll still need to use real estate in the living room that is currently under threat from the climbing tendencies of three small boys. It’s also going to take time before I finish making even that small collection of stock. (in fact at the current pace, the boys will have stopped climbing the walls and be going to college by then)

In the meantime, I’ve still only built one railway, in the form of ‘Westerooge’.

Thing is, the loco and stock on ‘Westerooge’ was more popular with the family: I think the smaller size makes the models easier to relate to. At the same time, making a minimum gauge model proved more feasible in a very small space. And I learned a lot, and I reckon I could do better next time. And the ‘make do and mend’ approach lends itself to shorter projects between the ‘modern image’ building: I can even use up all the bits from botched ‘modern image’ projects…

Or to put it another way, you may see me thinking of another minimum gauge project to relax a bit, and because my family like them and they come and play trains with me on them.

But then I keep thinking about narrow gauge intermodal trains, so I’ll probably keep building 5,5mm scale stuff in the background.

End of rambling, inconclusive post…

Read Full Post »

Skippy

Recently, I was running an errand and I passed a factory that uses a lot of roll-on containers, and very obligingly stores them next to the cycle path. So I took some photos in preparation for the skip-building project. This one shows the variety in these ‘standard’ designs. I know I should start by making a square-cornered version like that on the right, but something tells me I’m going to have a go at chamfered corners at some point… By the way, the fabric covering seems to be unique to this company. Any ideas why it is used and how would be gratefully received…

Read Full Post »

The van is coming together: the bogies are now properly fixed, the “bodge” referred to last week having been replaced by self-tapping screws (thank you Chris Krupa and Steve Bennet for pointing out the obvious solution), the ends are approximately vertical and properly attached, and the sides will be built over the next week. Remarkably the DG couplings are not only glued on, but also seem to work.

The only problem in this happy tale is that the sun abruptly went AWOL this morning, and it is now overcast and dull. This means I can’t make any photos of the model, so you’ll just have to trust me until such a time as the sun returns and I can get some real pictures. (Note to self: get a daylight bulb…) I’m not really upset about this as it meant the sun shone for my eldest son’s 5th birthday yesterday and he was able to ride his new bike for hours.

Besides, a friend sent me a link to this video last week, showing some narrow gauge in Poland using transporter wagons. After watching this 5 minute video I’d gone from being clueless on how transporters were used, to knowing enough information to model my own. There would have to be a couple of differences (Standard gauge wagons would need to be moved by locomotive, for example) but at least the mechanics are clear, and never mind that the loco has clanky bits. I believe this operation lasted until quite recently, when the lack of investment caught up with the line and the traffic went to the roads.

In search of diseasels I came across another Polish narrow gauge line. Now I don’t know a great deal about Polish lines, but they certainly manage to have a fair bit of variety. Here they manage to include another steam loco, one of the ubiquitous LxD2’s from Romania which were the standard large diseasel in Eastern Europe on a heavy freight, and a not to bad looking rail car.

I will leave you to enjoy this, while I go and look for a daylight bulb on Ebay

Read Full Post »

I was trying to make a highly original and witty title for this: as you can see I failed.


Finally the 20′ ISO container is orange. It’ll have to wait until after Japan for transfers, but at least it’s the right colour. For a while it was a sort of sludgy brown- far too foul for public viewing.

The white box sitting atop the container is the result of some concentrated modelmaking on Saturday. Eventually this will be a swap body. Unfortunately the “Postal” idea flopped this time because I failed to make the side doors properly, so this one is a more traditional single-door unit.
The postal one will be the next project…
The most likely possibility is that it will be lettered for a farmers cooperative, but as you know I’m not terribly decisive on these things, so that may change.

The Swapbody is awaiting feet at the moment. The monster inside is some salvaged roofing lead from a friend’s building project. Hopefully this will hold the unit on a wagon without having to resort to bluetack like I did as a teenager. For more pictures of model and prototype, click here

I had hoped to be able to report progress on a wagon but it seems that will have to wait until after the Japan trip. This Japan trip isn’t all bad: apart from a chance to see my two adorable little nieces, I can have a good look at the Japanese rail network, which is largely narrow gauge. Even better, my wife’s home town has a station with a sizable railcar depot so I expect I’ll be doing a fair bit of line siding, and posting more than a few pictures here.

I wonder if I can find a model shop…

Read Full Post »


Yesterday Stephan (My eldest son) and I spent the afternoon bashing nails into wood and produced “Daddy’s Modelling tools box” My modelmaking tools were languishing in old ice cream boxes and my wife was quite reasonably getting fed up of it cluttering our office/bedroom. It was this or be banished to the outer darkness of the cold utility room whenever I wanted to build anything.

Of course it was fun to build it with Stephan and he was really excited to be “Helping Daddy”.

The funny coloured box on top is the ISO container, hopefully in the process of being painted into Hapag-Lloyd Orange, or an approximation thereof.

I organised all my bits last night and this morning Stephan insisted that I go through it with him, and show him the contents of each drawer (of “our box”) in turn.

Read Full Post »

Older Posts »